Monday, June 29, 2009

I ♥ Faces; Week 25


It's another week, and that means another contest at I♥Faces! The contest is actually for a wedding picture, but since I don't have any of my past photography on my laptop, I'm doing the "Just For Fun" category. I love this snap shot we caught of Dawson, "basking in the sun" so to speak, lol. I've never done anything like this lil' edit before, so I for sure had fun playing with it. The words on the image are lyrics from a Brady Bunch song, thanks to my friend Shaniell's quick thinking. Something about "...I gotta get me some of those rays." I'm not really happy with the way the wording turned out, I had it better pictured in my head. Not the wording itself, but how they're put on the picture. One thing I am happy about is the coloring, the oranges and blues. I think it looks great together with the original image. If any of you ladies that read this have any comments or suggestions on this image, I'd really appreciate it if you'd comment me :)


Incase anyone is interested, here is the original for your viewing and comparing pleasure!


Sunday, June 28, 2009

3pk Photo Mask Freebie

Good evening bloggers :)
I love photo masks! I use them all over the place, like in siggies, my digiscrap pages and more. One of my favorite mask look right now is these splats I made. I hope you enjoy them as much as I do! There are three in this freebie pack. Click the image to download them. Instructions included! (BTW, isn't my neice beautiful?)


Monday, June 22, 2009

Birthday Wishes & Another Action

I just wanna start out by saying Happy Birthday Mommy!
Today's my mommas birthday! I dunno if or when she'll read this, but happy birthday!
In other news, I have a new action for ya'll today! This is a quick & easy way to give your photos a splash of color where u want it & a lil color burst to make it more vibrant! Once you press play, instructions will show when its done. Click the pic below to head to the download!

I ♥ Faces; Week 24 Contest

I found this blog and am officially in love. They have weekly contests and Im SOOOO in.
This weeks contest is called "Let's Hear It For The Boys!" and here is my entry for the kids category. I love this picture of my son Dawson. It clearly shows the wonder and curiousity through his eyes and facial expression that a brand new baby boy has. This picture makes my heart go pitter patter ♥ You can click the image to see the full size.


Thursday, June 18, 2009

Other Freebies

Everything here at Tara's Tid Bits is and always will be free. I have a page for a list of all my actions, templates & tutorials, but this list is for all other freebies not listed there. Click the pic to go to the page to read more and/or download that item.


Tutorial List

Here's a list of all my tutorials I've blogged about. Click the links below to go to the page where you can read the full tutorial.


Image extraction

Template List

Here's a list of all my templates I've blogged about. They include templates for not only digital scrapbooking, but craft making, photo collages and much more. Click the pics below to go to the page where you can download the template. Instructions are in the ZIP file for you.


Action List

Here's a list of all my actions I've blogged about. Click the pics below to go to the page where you can download the action. If instructions are needed for that action, they'll be in the ZIP file for you.


FAQ

Here's a list of my frequently asked questions I get. Most of them are "How-To" stuff. Have a question? Post a comment below and lemme know!

  • How do I install an action in Photoshop?
    Once you download the action you want, find the folder it's located in and then minimize that window. Then open the "My Computer" folder up in another window and up the folders in this order: C drive>Program Files>Adobe>Photoshop>Presets>Photoshop Actions. Then maximize the window with the action (.atn file) and drag it over. Tip: If your PS program is already open, restart it and you'll see your action in the action list.
  • Which Photoshop program do you use?
    PS7
  • Is there a way I can get the Photoshop program for free?
    Nope, but there is a program called Gimp, that is a lot like PS but it's free. It doesnt do NEAR as much, but for simple photo edits it works just as well. FYI: PS Actions and Presets and .psd documents will NOT work in Gimp. Two different programs, ya know? But a lot of it is the same, so you may be able to follow along one of my tutorials, just tweaking it along the way for Gimp. If you interested in downloading it, just google it :)

Tuesday, June 16, 2009

Free PS Action

Well, afternoon everyone :)
I know I said I'd be on yesterday with a tutorial, but that didn't actually work out as planned. Something funky happened with my laptop and it wouldn't start up all the way & crashed. It took me all day to figure out the problem and late last night I fixed it, yay!
Aaannnnnd, I know I told ya I'd give ya a tutorial, but how bout an action instead? Yes? Ok, good! This is one I made for an effect I use myself a lot! I love it really. What it does is it turns your image black & white and gives you two layers of softness, "Soft" & "Extra Soft", just by turning their visability on & off. This action uses gaussian blur filters, where they are set for high resolution images, but there are directions within the action that tells you what to do for a low res picture as well. I hope you enjoy playing with this one like I do! Oh, and also, I made this action in PS7 so I'm not sure which PS programs it will all work in. Please lemme know in the comments below if it does/doesn't work for you. Thanks!
Click the image to download this PS .atn file!


P.S. I used some pictures of my lil sister as my example above. Isn't she gorgeous?

Friday, June 12, 2009

Where's Waldo?

Okay.. not really. But 'Where's Tara?'... well I'm right here. Ya I know I havent posted in over a month. Guess thats what happens when you're busy with a newborn & a toddler. Anywho I've got plans to post a tutorial on Monday. I'll work on it over the weekend :) Check back Monday!

Friday, May 1, 2009

New PS Tutorial

Well hello to all out there in Blogger land! Sorry Ive been lacking on updates, I've been spending a lot of time with my son. He's amazing♥
Well, lets jump right in to the next tutorial! We're gonna learn how to cut an image out of a picture, or well, cut out the background... whichever way you wanna look at it. To do this, we'll work either the pen tool (P), the magic wand (W) or the lasso tool (L). Which tool you use all depends on your image and how clean and clear the background is.

Go ahead and open up your version of PS and then open up your image you want to work with. I'll show you first with the pen tool (press P on your keyboard to select this tool) because this will work well with any image, no matter the background. So go ahead and make a path around the part of the image you are wanting to cut out and/or keep. To do this, just start clicking around this part you're cutting out and/or keeping. Make sure to click in small strides to get a good close path to your object. You may want to zoom close in so you can see the edges better. Once you're back around at your first click, click on it to close your work path. So instead of seeing your open path (small lines w/ little boxes), you'll see a closed path thats just a small solid line (see images below).


Then head over to your LP (Layers Pallette) and click on the Paths tab. Right click on the work path and select "Make Selection" (see first pic below). Now your solid path line will look like a bunch of little lines moving around your object. Now, with your selection selected, you can either cut (CTRL+V) or copy (CTRL+C) it. Now, click on File>New, make sure the "transparent" box is clicked and then paste your selection in the new file (see second pic below).


From here you can use your now cut out image to paste it onto another image, add a new background and do all sorts of stuff! Just use your imagination! In this tutorial, we used the pen tool to get our selection to do our path. Like I mentioned above, you can also use the different lasso tools to get your selection, or the magic wand tool. Play around with those different tools to find the one that works best for you and your image!

Wednesday, April 22, 2009

I'm BACK! And with a freebie!

Hey everyone! Sorry I've been MIA... but I've been busy enjoying my new son! In other news, I have another template pack freebie for you! This one has 5 templates. Once again, like the last ones, they are 5x7 in size and 300 dpi. Personal use only, please! These can be used for announcements, invitations, small scrapbook pages and much more! Instructions are included in the ZIP file. Remember that comments are appreciated and I'd LOVE to see anything you do with these!


[click pic for download]

Here are some examples:


Tuesday, April 14, 2009

Blogging & A Baby

You dig my corny title? Ha ha! Anyways... I know I havent blogged in a couple of days and Im sorry bout that... but we (the family) are at the hospital cause I had my baby yesterday! YAY! meet lil Dawson Anthony!

He's the best baby ever! I couldn't ask for a better newborn! In other news, when I get back home and settled in, I have another Template Pack Freebie for you! This time there are 5 of them, and they're all the same size as the last template pack (5x7's). So keep checkin back in the next few days for that freebie!


Wednesday, April 8, 2009

I Think My Heart Stopped...

So I'm reading the blogs that I follow this morning and Lauren over at Lauren's Bite blogged about some Twilight related photoshop pics she found on Photobucket, with some one-liner quotes above them that were very funny!! Anywho.. I just wanted to share one of those pictures because the danged thing about made my heart stop. I mean I love me some Robert Pattison, and I love me some Edward Cullen, but whoever did this manip is a freakin genius. I LOVE YOU Mystery Manip Maker. No lie. So friends, join me in drooling over this fine picture.

Tuesday, April 7, 2009

Template Pack Freebie!

So as I'm preparing for the birth of my son next Monday the 13th, I'm working on a birth announcement where all I have to do is plop in a picture and his stats. Normally when I scrap something that I'm really into, I'll make a layout as I go and save it for further use. So I did that with a couple different layouts for you. These can be used for announcements or invitations, whatever you want. They're set to print at a 5x7, they're 300 dpi and they're PSD template files. Each layer is named accordingly so you'll know what to paste and where. In this ZIP file is also instructions for those that are newbies to templates! After you paste, all you have to do is add your text and any embellishments and you're done! I hope you enjoy these as much as I enjoyed making them. (Please keep in mind, all names, and stats on the following LO's are fake. The images are of my daughter.) You may click on all of the templates/LO's below to see the bigger version. Comments are ALWAYS appreciated. Thanks and happy scrapping!


[click pic for download]


P.S. I just wanted to throw out there, that in the 3rd template with the "torn paper" look, you do NOT have to leave that white (like I did from the template to the LO sample). The layer in that template has a layer grouped with it so you can paste what you want (like a digi-scrap paper, or a solid color) on it, and the blending mode is set to "Multiply", so everything will automatically flush nicely with the white paper. If you have any questions or problems on this, feel free to lemme know!

Sunday, April 5, 2009

Free Layout Template!

So I'm getting layouts ready for Easter pictures next week and then I decided this would be a great time to make a template for you all! So here's my "Easter Memories" layout template free for you to download! The ZIP file comes with complete instructions as well.


[click pic for download]

Here is my layout I did as a sample (below), with some pictures from last years Easter. Remember, that this template doesn't include any embellishments. Once you insert the papers and pictures of your choosing, then you can creatively decide which embellishments you want to use, or any journaling and also where you want 'em! I hope you guys enjoy this one, and please don't forget - I'm still new so ANY comments would be appreciated. And I'd love to see any work that you do with my stuff, so don't forget to link it in your comments! (Oh and fyi: you can click the sample below for a larger version)

Saturday, April 4, 2009

Glitter Alphas Freebie!

[click pic to download]


So here's my second digi scrap freebie! These are the upper alphas, and the lower alphas will be coming soon. They're in a rainbow of glitter colors (blue, purple, red, orange, yellow, & green). The drop shadow is on all of the letters and very subtle for a great sticker-look. They are all 300 dpi. and are .PNG files. Please remember that these are for PU only!

Like with anything I give (freebies, tutorials, etc.), if you use them, I'd love to see what you come up with! So please post a link/pic in the comments. ALL comments are appreciated!

Hope you guys have a great night! I look forward to seeing what you come up with!


Tuesday, March 31, 2009

Time For Pt. 2!


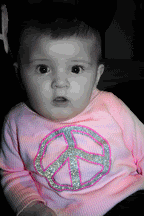
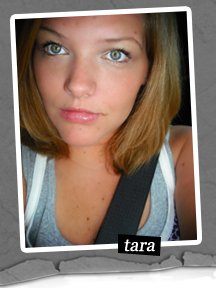
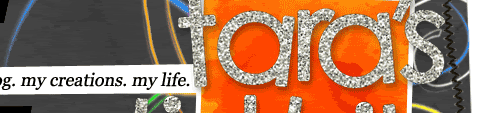
Okay, so yesterday I started a tutorial on how I made this image to the right. In Part 1, I covered how I made the image black and white, and brought back the pink in her shirt. Today in Part 2, I will continue with how I made the peace sign in her shirt have that glitter effect. For those of you who are following, or even if you are new, I just wanted to throw out there that Pt. 1 and Pt. 2 can be used separately on different images. That's why I said from the get go that this tutorial was a 2-1! Alright, so here we go with Part 2, so open up your Photoshop guys!

First things first, open up your desired image. Just FYI on something real quick, if your image is a large file, I would suggest resizing your picture to how big you want the image to be when you upload it to the internet. If you do the glitter effect on a large image, upload it, and then use it somewhere where it automatically will be used smaller (like for a signature, or an avatar or something) the glitter effect changes dramatically. It looks more like a strobe light and it's all messed up, versus a nice clean sparkle. If you do need to resize, just go up to Image > Image Size and then from there you can enter your dimensions on how big you want it. Now we're ready to continue! Next, you're going to want to find a glitter texture image, or something starry/sparkly. You can Google for something pretty easy. You'll want to find an image the same color of the object in the picture that you're making "glitter". I found and used the silver glitter texture image 
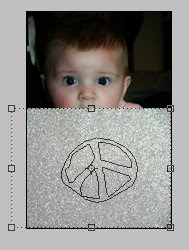
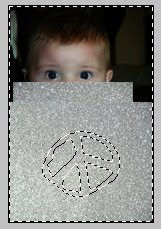
here at this site towards the very bottom. Go ahead and open up the glitter image and minimize it in PS so we can use this in a little bit. Now back to our original image... You're going to want to select the Pen Tool from your Tool Palette (TP), or you can just hit the "p" key on the keyboard. Use this tool to click around the spot of your image you're wanting to "glitter". When you're done and back to the first spot you clicked, the area you just outlined should become a skinny solid line. This is called a "path". Take notice, that in your Layers Palette (LP), there is a tab for "Paths" (we'll use this later). Now bring back up the glitter image. Hit on your keyboard Ctrl+A (to select all), then hit Ctrl+C (to copy), then you can X outta that glitter image. Back over on your other image, on your keyboard, hit Ctrl+V (to paste). From here you can resize that glitter image to make sure that it fits completely over your path you just made, you should still see that skinny solid line where your path is over the glitter image. You should be looking at something like this:

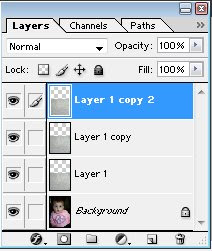
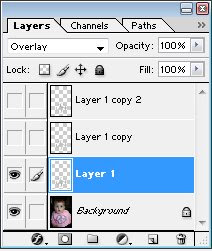
Now, over on your LP, right click the glitter image layer and then hit "Duplicate Image", when the next prompt comes up, just hit "OK" or "Enter" on your keyboard. Then right click that layer, and do the same. You should now have 4 layers. Background, Layer 1, Layer 1 Copy, & Layer 1 Copy 2. Your LP should look like this:

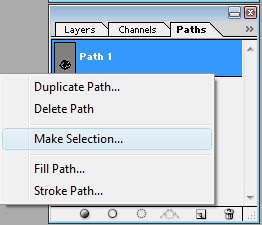
We're going to leave "Layer 1" just how it is, so now select "Layer 1 Copy" and then go up to Edit > Transform > Rotate 90* CW. You'll see that layer on your picture rotate ninety degrees. Then click on "Layer 1 Copy 2", and do the same but Rotate 180*, and you'll see that layer then flip as well. What this does is it makes the varients of glitter on the image go in different directions and when we animate this thing, thats what gives the picture the look of the moving glitter. For example, like on "Layer 1", where there is a shiny spot in the top right hand corner, on "Layer 1 Copy" it's now in the bottom right hand corner because you rotated that layer 90* CW. See where I'm going with this? Good. So now back to your path you created. On your LP, click the Paths tab. Right click "Path 1" and then "Make selection" (see first pic below). When the prompt comes up, once again just hit "OK" or "Enter" on the keyboard. Now your path on your image should look like little moving lines so-to-speak. On your LP, click back over to the Layers tab. On your keyboard hit Shift+Ctrl+I (this will inverse the selection) and now on your image you should see those little moving lines all around your image (see second pic).

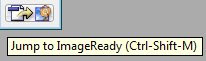
Next, with one of the glitter layers selected hit the "Delete" key on your keyboard. Repeat this on the other two glitter layers. This deletes all that excess glitter around the path that you created. So now your picture should only be showing the glitter image inside the path. Hit Ctrl+D on your keyboard to deselect the inversed path (this turns off the little moving lines). Now over on your LP, turn the visability off on two of the glitter layers leaving only ONE glitter layer visable. To do this, hit the little eye next to the layer (see first pic below). Make sure the layer that is visable is selected. Now we're going to decided which blending mode is best for your image. On the top of your LP, there is a drop down menu that right now states "Normal". Look through those other modes by clicking on them and watching your picture change with each one. Which one makes the glitter look apart of your image vs. a cutout on top of it? Normally "Overlay" will do the trick, but others work as well. Once you've picked your mode, turn the visability back on with the other two layers and change their modes as well. Now we're ready for the animation! We're going to jump to Adobe ImageReady by clicking the button at the bottom of our TP (see second pic).

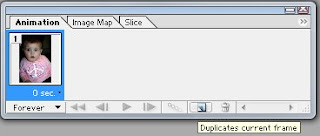
Once ImageReady opens and loads, you'll find it looks really similar to the layout of Photoshop, despite a few extra things. One of those extra things is the Animation Palette (AP) in the bottom left hand corner. Right now you should see your image in a box with a "1". This means you have one frame in your animation. We need 4 frames. So in your AP, your going to want to hit the little button on the bottom that looks like a little square sticky note (see first pic below). Keep clicking that button until you have 4 frames in your AP (see second pic).


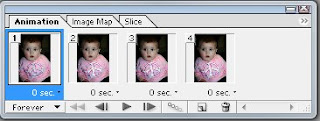
Now, you remember how we turned the layer visibility off and on? We're bout to do that again. Make sure Frame 1 is selected, and over in your LP turn the visibility off the top two layers, leaving only the first glitter layer visible. Then select Frame 2, and turn off the visibility for the first and last glitter layers, leaving only the middle visible. Then for Frame 3, turn off the visibility for the first two glitter layers, leaving only the third visible. Then for Frame 4, do the same as you did for Frame 2, leaving the inbetween layer. Guess what? We're done! Check out your new animation by hitting the little triangle Play button on the bottom of your AP. Congratulations! You just made a glitter image!
The next part is very important. Saving it. Make sure you save it right, or it won't work. Go up to File > Save Optimized As. Then you can select where you want to save it to. By default ImageReady will save your animation as a GIF file, but just incase, double check that before you hit "Save". If you do not save it as a GIF, it will not work.
And there you have it ladies and gents! I hope you enjoyed my first tutorial and get plenty of use outta it. Comments are always appreciated and I would love to see any work that you do as well. If you aren't already, make sure you follow me to catch all my updates! Until next time...