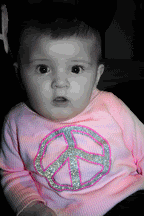
Like I promised earlier, here's the tutorial for the image below, except I'm going to be posting this in two parts, one today, one tomorrow. Just FYI for everyone, I do have some people following my blog that are completely new to PS and so my tutorials will be very basic. I'll be breaking it down bit by bit and explaining things a little slower than normal for that purpose, so please bear with me if it's a little too slow for you! This tutorial will end up showing you two things:
How to turn an image black and white and keep something colored (Pt. 1 - that's today) and then
How to make an animated image with a glitter effect (
Pt. 2 - that's tomorrow)
.
First things first, open up your desired image. Then head over to your Layers
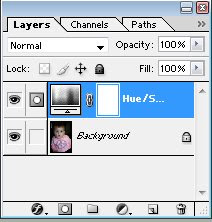
Palette (thats in the bottom right hand corner by default) and click the little button at the bottom that looks like a half-black/half-white circle. This is the "Create New Fill or Adjustment Layer" button. Then, from the list it brings up, click on "Hue/Saturation". (See first picture) Click on the Saturation slider and slide it all the way to the left to desaturate the image, or you can just type in "-100" in the Saturation spot. Then click OK. Now your Layers Palette should look like this. (See second picture)

Your image itself should be black and white (the smaller version of your picture in the LP should still be colored)... So now we're going to bring back in the color we want to stand out. In my case, I want her pink shirt to stand out. So now I'm going to pick up the paint brush tool by pressing the "b" key on my keyboard (or you can click the brush tool on the Tool Palette). You'll want to change your brush type (see first picture below, this is located right under the File, Edit, Image.. etc. at the very top) to a "Soft Round" brush. This will give the color selection you're about to do a softer more natural edge than the "Hard Round" brush. You can use the left and right bracket keys ( [ and ] ) on your keyboard to make the brush size smaller or larger to your taste. Now make sure that the color you're "painting with" is black. In the Tool Palette, look for the little boxes towards the bottom that shows your foreground and background colors. By default, it should show black and white. If it doesn't, then hit the "d" key on your keyboard to change your colors back to default.

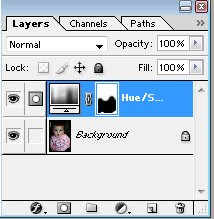
Now we're going to "paint" the color back into the picture. Over on your Layers Palette, make sure the top layer (the Hue/Saturation layer & layer mask you just made) is selected and not the background layer. In this top layer, you'll see a white rectangle. This is called a Layer Mask. It is white for a reason, its so when you paint with black on your image it will be "erasing" the white and making the layer below (in this case your image, which is labeled "background") show through. So take that Soft Round brush with black and "paint" on your image in the areas you want the color to show back through. Like I said before, in my case it's the pink shirt. After you've done this, your LP should look similar to this. (see the image below) The only difference will be is that the black on your Layer Mask will be in the area you "painted" on.
So now your image should be black and white with your enhanced color part! Part 1 of this tutorial is complete now. Stay tuned till tomorrow for Pt. 2 when we'll learn how to make a part of an image glitter! You'll be able to use Pt. 2 of this tutorial on it's own for any image, or to add on to the image we worked on today. Talk to ya'll tomorrow!


0 comments:
Post a Comment