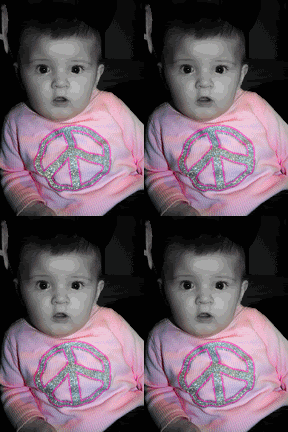
Okay, so yesterday I started a tutorial on how I made this image to the right.
In Part 1, I covered how I made the image black and white, and brought back the pink in her shirt. Today in Part 2, I will continue with how I made the peace sign in her shirt have that glitter effect. For those of you who are following, or even if you are new, I just wanted to throw out there that
Pt. 1 and Pt. 2 can be used separately on different images. That's why I said from the get go that this tutorial was a 2-1! Alright, so here we go with Part 2, so open up your Photoshop guys!
First things first, open up your desired image. Just FYI on something real quick, if your image is a large file, I would suggest resizing your picture to how big you want the image to be when you upload it to the internet. If you do the glitter effect on a large image, upload it, and then use it somewhere where it automatically will be used smaller (like for a signature, or an avatar or something) the glitter effect changes dramatically. It looks more like a strobe light and it's all messed up, versus a nice clean sparkle. If you do need to resize, just go up to Image > Image Size and then from there you can enter your dimensions on how big you want it. Now we're ready to continue! Next, you're going to want to find a glitter texture image, or something starry/sparkly. You can
Google for something pretty easy. You'll want to find an image the same color of the object in the picture that you're making "glitter". I found and used the silver glitter texture image
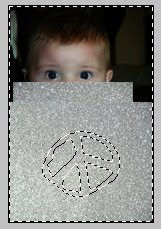
here at this site towards the very bottom. Go ahead and open up the glitter image and minimize it in PS so we can use this in a little bit. Now back to our original image... You're going to want to select the Pen Tool from your Tool Palette (TP), or you can just hit the "p" key on the keyboard. Use this tool to click around the spot of your image you're wanting to "glitter". When you're done and back to the first spot you clicked, the area you just outlined should become a skinny solid line. This is called a "path". Take notice, that in your Layers Palette (LP), there is a tab for "Paths" (we'll use this later). Now bring back up the glitter image. Hit on your keyboard Ctrl+A (to select all), then hit Ctrl+C (to copy), then you can X outta that glitter image. Back over on your other image, on your keyboard, hit Ctrl+V (to paste). From here you can resize that glitter image to make sure that it fits completely over your path you just made, you should still see that skinny solid line where your path is over the glitter image. You should be looking at something like this:
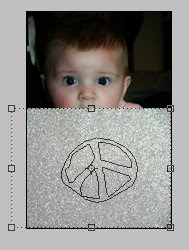
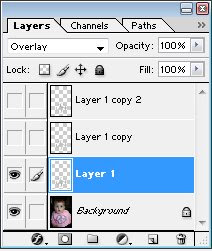
Now, over on your LP, right click the glitter image layer and then hit "Duplicate Image", when the next prompt comes up, just hit "OK" or "Enter" on your keyboard. Then right click that layer, and do the same. You should now have 4 layers. Background, Layer 1, Layer 1 Copy, & Layer 1 Copy 2. Your LP should look like this:
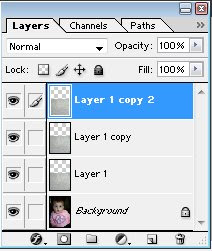
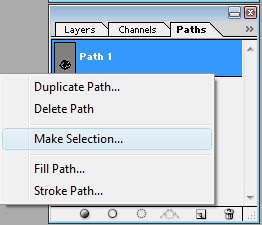
We're going to leave "Layer 1" just how it is, so now select "Layer 1 Copy" and then go up to Edit > Transform > Rotate 90* CW. You'll see that layer on your picture rotate ninety degrees. Then click on "Layer 1 Copy 2", and do the same but Rotate 180*, and you'll see that layer then flip as well. What this does is it makes the varients of glitter on the image go in different directions and when we animate this thing, thats what gives the picture the look of the moving glitter. For example, like on "Layer 1", where there is a shiny spot in the top right hand corner, on "Layer 1 Copy" it's now in the bottom right hand corner because you rotated that layer 90* CW. See where I'm going with this? Good. So now back to your path you created. On your LP, click the Paths tab. Right click "Path 1" and then "Make selection" (see first pic below). When the prompt comes up, once again just hit "OK" or "Enter" on the keyboard. Now your path on your image should look like little moving lines so-to-speak. On your LP, click back over to the Layers tab. On your keyboard hit Shift+Ctrl+I (this will inverse the selection) and now on your image you should see those little moving lines all around your image (see second pic).
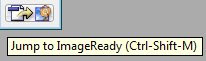
Next, with one of the glitter layers selected hit the "Delete" key on your keyboard. Repeat this on the other two glitter layers. This deletes all that excess glitter around the path that you created. So now your picture should only be showing the glitter image inside the path. Hit Ctrl+D on your keyboard to deselect the inversed path (this turns off the little moving lines). Now over on your LP, turn the visability off on two of the glitter layers leaving only ONE glitter layer visable. To do this, hit the little eye next to the layer (see first pic below). Make sure the layer that is visable is selected. Now we're going to decided which blending mode is best for your image. On the top of your LP, there is a drop down menu that right now states "Normal". Look through those other modes by clicking on them and watching your picture change with each one. Which one makes the glitter look apart of your image vs. a cutout on top of it? Normally "Overlay" will do the trick, but others work as well. Once you've picked your mode, turn the visability back on with the other two layers and change their modes as well. Now we're ready for the animation! We're going to jump to Adobe ImageReady by clicking the button at the bottom of our TP (see second pic).
Once ImageReady opens and loads, you'll find it looks really similar to the layout of Photoshop, despite a few extra things. One of those extra things is the Animation Palette (AP) in the bottom left hand corner. Right now you should see your image in a box with a "1". This means you have one frame in your animation. We need 4 frames. So in your AP, your going to want to hit the little button on the bottom that looks like a little square sticky note (see first pic below). Keep clicking that button until you have 4 frames in your AP (see second pic).
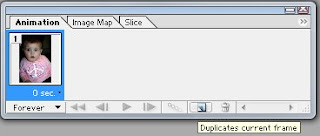
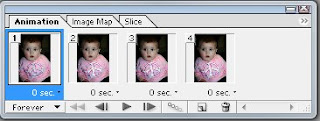
Now, you remember how we turned the layer visibility off and on? We're bout to do that again. Make sure Frame 1 is selected, and over in your LP turn the visibility off the top two layers, leaving only the first glitter layer visible. Then select Frame 2, and turn off the visibility for the first and last glitter layers, leaving only the middle visible. Then for Frame 3, turn off the visibility for the first two glitter layers, leaving only the third visible. Then for Frame 4, do the same as you did for Frame 2, leaving the inbetween layer. Guess what? We're done! Check out your new animation by hitting the little triangle Play button on the bottom of your AP. Congratulations! You just made a glitter image!
The next part is very important. Saving it. Make sure you save it right, or it won't work. Go up to File > Save Optimized As. Then you can select where you want to save it to. By default ImageReady will save your animation as a GIF file, but just incase, double check that before you hit "Save". If you do not save it as a GIF, it will not work.
And there you have it ladies and gents! I hope you enjoyed my first tutorial and get plenty of use outta it. Comments are always appreciated and I would love to see any work that you do as well. If you aren't already, make sure you follow me to catch all my updates! Until next time...